Removing Seatpost Stuck in Carbon Frame
by Big Al • June 12, 2023
So this comes up a lot more often than you might think. An expensive carbon frame with an aluminum seatpost hopelessly stuck in the seat tube. Most people think of seatposts sticking in a metal frame be it steel or aluminum because the possibility of corrosion is usually pretty self evident. Many folks buy their first carbon frame thinking they don't have to worry about corrosion anymore because it's carbon, it's not metal so can't corrode right? Well, technically the carbon itself won't corrode but when you start introducing parts made of other materials you can have a problem and that problem is galvanic corrosion.
I'm pausing for a second here because I'm going to be dropping some knowledge on why an aluminum seatpost can get stuck in a carbon frame as well as why it seems impossible to get out. If you are in the TLDR crowd and just want to know how to get your seatpost out NOW, skip down to where I get into the removal. If you like science-y stuff like me then read on.
Continuing... Yes, galvanic corrosion is a real thing and there's lots of potential for it on a carbon frame. (No pun intended, ok maybe just a little.) Here's a great definition and requirements for galvanic corrosion from the Specialty Steel Industry of North America (SSINA).
"When two different metals or alloys are immersed in a corrosive solution or regularly connected by moisture, each will develop a corrosion potential. If the conditions for galvanic corrosion are present, the more noble metal will become the cathode and the more active metal will become the anode. A measurable current may flow between the anode and the cathode. If this occurs, the anode’s rate of corrosion in the service environment will be increased while the cathode’s corrosion rate will decrease. The increased corrosion of the anode is called “galvanic corrosion.”
Requirements for Galvanic Corrosion:
In order for galvanic corrosion to occur, three elements are required.
- Two metals with different corrosion potentials
- Direct metal-to-metal electrical contact
- A conductive electrolyte solution (e.g. water) must connect the two metals on a regular basis. The electrolyte solution creates a “conductive path”. This could occur when there is regular immersion, condensation, rain, fog exposure or other sources of moisture that dampen and connect the two metals.
If you made it this far you probably think you've got me, "Carbon isn't a metal so you're wrong!" You are right there, carbon is not a metal but it does conduct electricity. In fact the graphite in carbon is the only non-metal that does conduct electricity. The ability of both materials to conduct electricity is one of the three requirements for galvanic corrosion. Aluminum seatpost in carbon frame? Direct electrical contact for sure.
Another requirement of galvanic corrosion is different corrosion potentials. Take a look at the chart below of the corrosion potentials of various materials (thanks again SSINA). If you look way down at the bottom you'll see graphite (aka carbon for the sake of this discussion) as the most noble or "cathodic" on the list. If you scroll up to the top of the list you'll see aluminum alloys as one of the least noble or most "anodic" on the list. The more noble the material, the less likely it is to corrode. Conversely the less noble the material, the more likely it is to corrode. So aluminum seatpost in a carbon frame? We've got a while lotta potential and not the kind my Mom thought I had.

Last but not least we need an electrolyte solution to create a conductive path. As described by SSINA, "This could occur when there is regular immersion, condensation, rain, fog exposure or other sources of moisture that dampen and connect the two metals." A bicycle seatpost exposed to moisture, that never happens right? Only pretty much always unless your bike is hanging in a museum.
So to review we have all the requirements for galvanic corrosion. Different corrosion potential, direct electrical contact and an electrolyte solution. Not only do we have all the requirements, they are darn near perfect outside of a lab setup.
Now that we have determined we have perfect conditions for galvanic corrosion let's look at the mechanics of what's going on down there in the seat tube when it happens. Think about when you see a big ol' hunk of rusting metal, picture flakes of rust building up. Some material is being removed from the parent but the chemical reaction is forming a new material from the parent material and the moisture it's reacting with. It's the simple conservation of mass, it can't be created or destroyed. The chemical composition may change but it's all still there. Rusting (or corroding in the case of aluminum) is actually increasing the total volume of material because it's pulling molecules from moisture to fuel the chemical reaction.
A seatpost has to be very close to the same diameter as the seat tube so it can be tightened down with the seat collar and stay in place when you're riding. Nominally they are they same size, a 31.6mm seat tube uses a 31.6mm seatpost. In reality though these two are different by maybe just a couple hundredths of a millimeter so the seatpost can actually slip into the seat tube. Nonetheless, this is a very close fit. If you fire up a chemical reaction inside that tiny gap that is forming more material, there isn't anywhere for it to go. As the reaction progresses over time, more and more material is squeezing against the seat tube. In machining terms you've gone from a slip fit to an interference fit with the added benefit of some high fiction material filling the gap.
Left unaddressed too long and that seatpost will be in there so tight that there will be no mechanical means of removing it without destroying the frame. There will be no penetrant regardless of brand, amount or time that will have any effect. Trust me, many have tried and failed. The only way that post is coming out is the same way it got stuck in there in the first place, science. What needs to be done is to chemically remove (dissolve) the seatpost.
Here is my blanket disclaimer. The chemical removal of an aluminum seatpost is dangerous. The chemical used and resulting reaction can cause serious burns, blindness, fire and explosion. The following description of my process is for educational and entertainment purposes only. If you choose to follow this process it is at your own risk, Bikeman assumes not liability whatsoever. If you choose to follow this process it should only be undertaken outside in well ventilated area with a water supply. Personal protective equipment should be worn at all times including but not limited to chemical resistant gloves and goggles.
Now that that's out of the way let's get back to the science. Alkaline solutions are corrosive to aluminum, the more alkaline the more corrosive. Alkaline is the opposite of acid, but is every bit as corrosive at the extreme when combined with the material it reacts with. The higher the pH the more alkaline a substance is. 7 is the midpoint of the pH scale, below it is acidic and above it alkaline. To put things in perspective, milk is basically a 7 and battery acid is around a 0. The chemical I use to remove a stuck seatpost is sodium hydroxide, its pH is 14. Being exactly the same distance in the other direction away from milk as battery acid should give you a pretty good idea of how dangerous it is.
Sodium hydroxide has a couple aliases, caustic soda and lye. Yup, lye. The stuff they make soap out of and dispose bodies with in horror movies. So if it is soooo dangerous then why use sodium hydroxide to chemically remove (dissolve) an aluminum seatpost you ask? Twofold, it is easily acquired and extremely effective. You could probably use something less reactive with aluminum but it would take a long, long, long, loooong time. We're talking like years here and I personally don't want to wait that long, the whole point is to have a usable frame again now right?
You'll usually find sodium hydroxide in the drain cleaner section at your local hardware store or home improvement box store. Sodium hydroxide is typically the main ingredient in most drain cleaners because it dissolves fat and grease like nobody's business. It'll also dissolve skin just as easily so it needs to be handled with extreme caution. What I look for in particular is pure sodium hydroxide crystals. No liquid drain cleaner, nothing with other additives, just straight sodium hydroxide crystals.
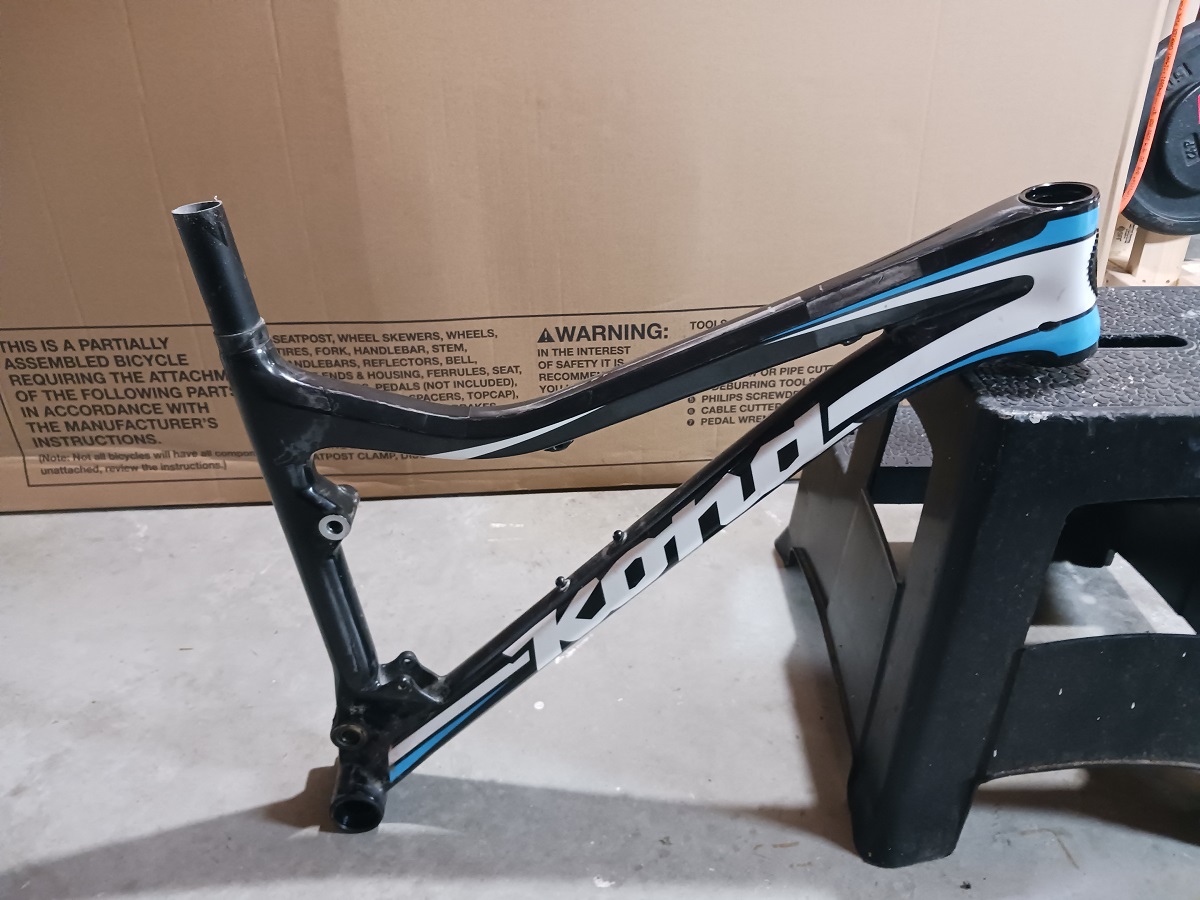
My most recent example of chemical removal is from this nice carbon Kona Hei Hei full suspension mountain bike. The first step is always to strip the bike down to the bare frame. Everything that can come off should come off because if it's aluminum and the sodium hydroxide touches it, it will dissolve it. It's also just way too cumbersome to try and do this with a complete bike. In this case the rear swingarm and linkage was easily separated from the main triangle, the bottom bracket was taken out as well. The headset cups were left in because they are far away enough from the action. If it's a rigid frame I definitely take off the rear derailleur hanger.
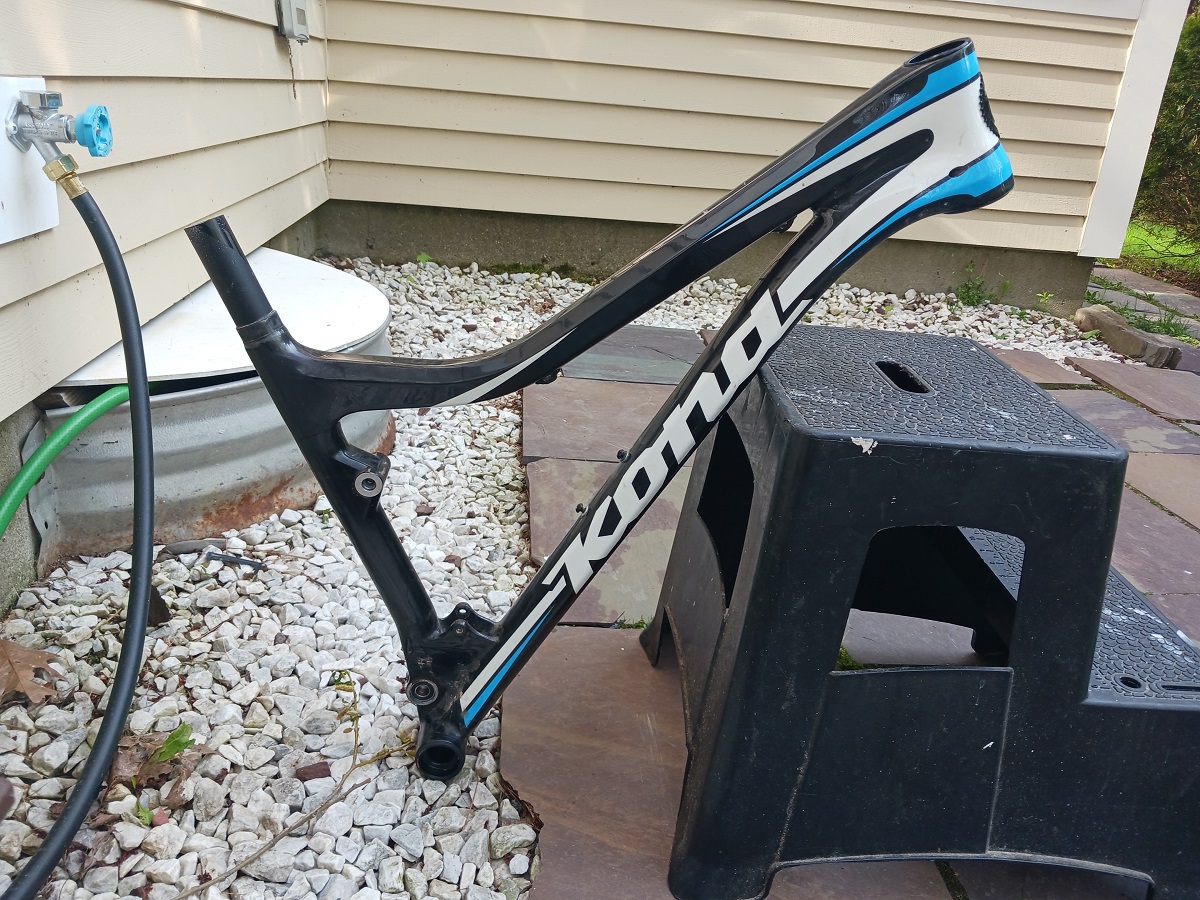
The next step is to cut off the top of the seatpost and remove the seat collar. I always pause before cutting off the top of a nice seatpost because it seems just so wrong. The seatpost is a goner though no matter how nice it is. The seatpost is already ruined, it just can't be seen and that's reason we're in this predicament in the first place. I leave a stub of the post sticking out so there is still something to grab on to.
Now for a well ventilated area outside with a water source, my patio works quite nicely for this. Every frame has it's own set of circumstances that can complicate the setup and removal. This particular frame has aluminum inserts for attaching the rear swingarm and linkage. Those are not removable so I needed to work around them. Lucky for me they were not exposed on the interior of the seat tube so all I had to worry about is not letting any sodium hydroxide get on them from the outside. Propping up the frame on a stool at a steep angle would help with this as long as I didn't get too loosey goosey with the sodium hydroxide. Now with most frames you also have to worry about the bottom bracket shell and water bottle bosses. Most frames are open from the seat tube into the bottom bracket shell and have water bottle bosses on the seat tube. This is a problem because one you need the seat tube to hold liquid and two the inserts for water bottle bosses and bottom bracket shells are usually aluminum. Get sodium hydroxide on those and they'll start to dissolve just like the seat post. What I've done in the past to work around this is to seal off the seat tube just above the top water bottle boss with spray foam. I feed the nozzle through the boss and squirt just enough to create a plug. I don't put so much in that it starts to fill the inside of the seatpost because the sodium hydroxide can't dissolve what it can't get to. When it is cured I test it by filling the seat tube with water to make sure it doesn't leak. After the job is done I run a dowel down into the seat tube to punch out the spray foam plug. I got lucky to not have to go through all that with this frame because the seat tube isn't open to the bottom bracket shell and there are no water bottle bosses on the seat tube.
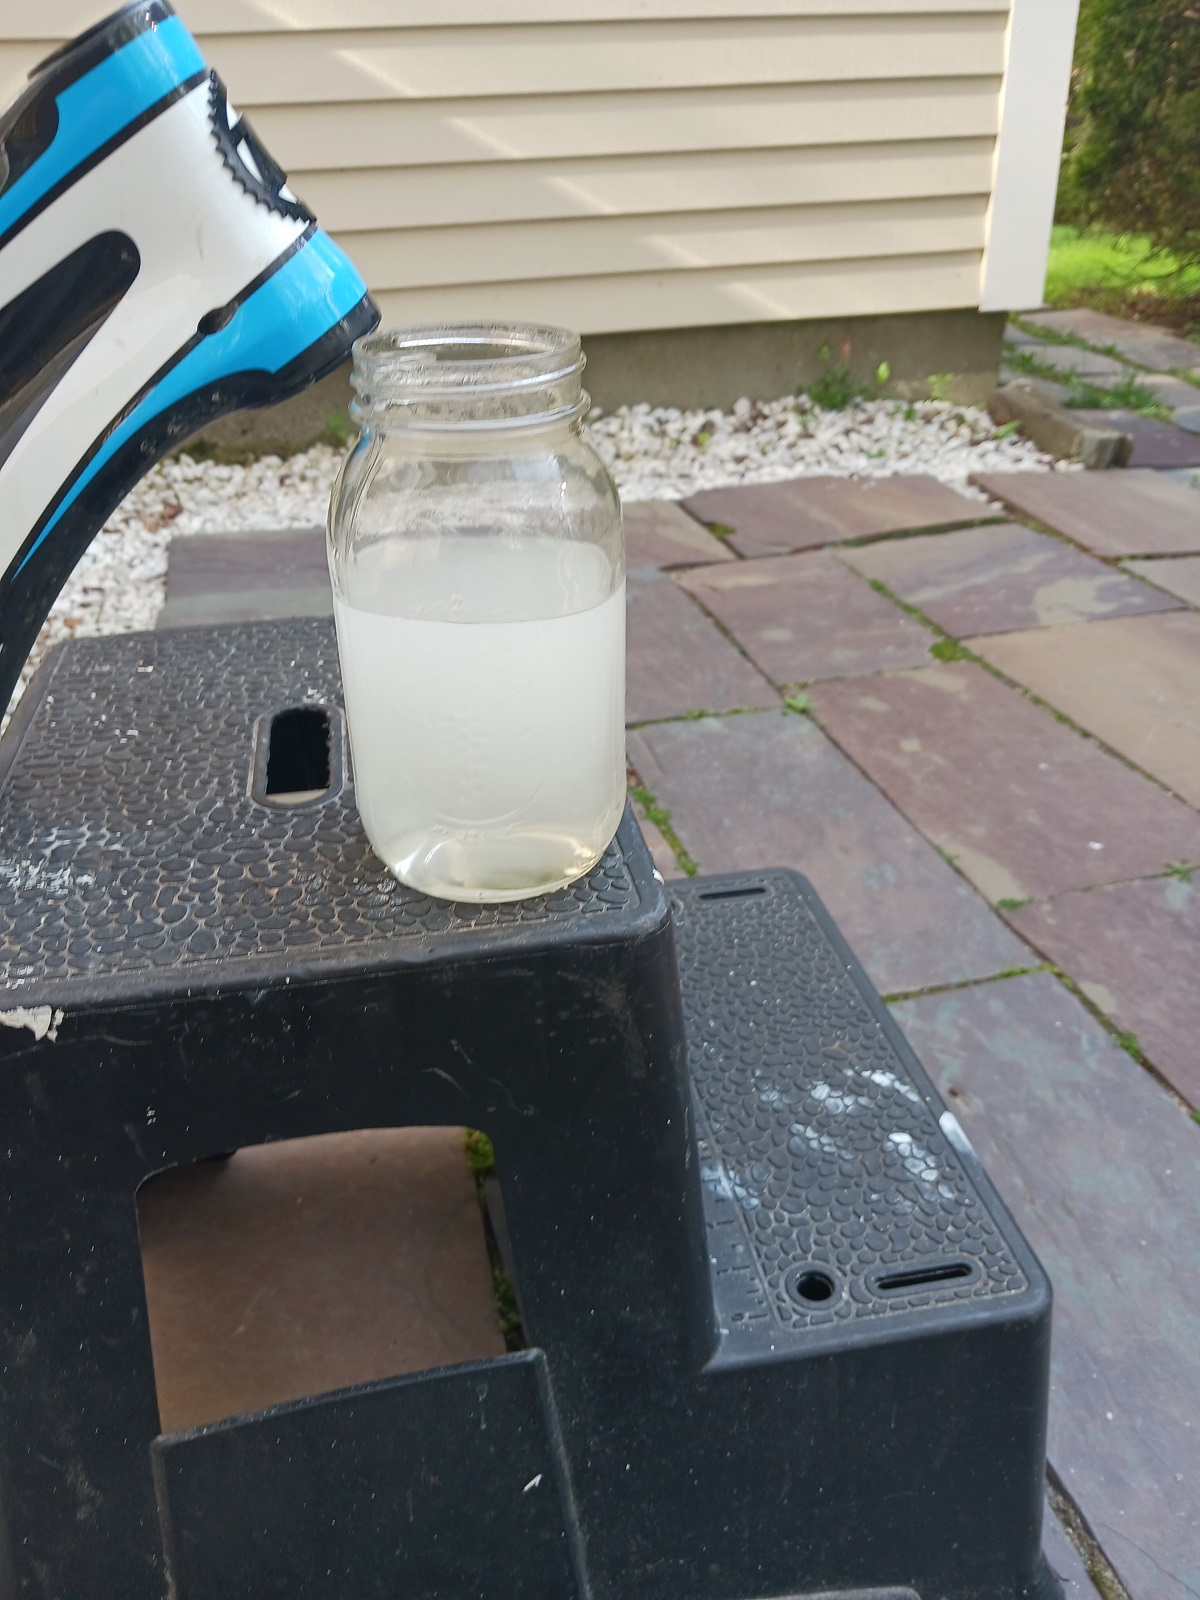
Next I mix up a solution of water and sodium hydroxide crystals. Typically this falls probably in the range of 4-6 parts water to 1 part sodium hydroxide crystals. This doesn't have to be super exact, I just eyeball it (through my eye protection). I slowly add the crystals to the water and stir gently, add them too fast and they'll just reform one big crystal instead of dissolving in the water. I use a large glass Mason jar to mix the solution in. Glass doesn't react with the sodium hydroxide, you can see through it and it won't soften or melt. Dissolving the sodium hydroxide in water is an exothermic reaction, i.e. it creates heat. It can make the jar hot, like burn your hand hot if the concentration is too high or the volume is too large.
Now is where the rubber hits the road. I use a plastic funnel to SLOWLY fill the seat tube with the sodium hydroxide solution. I only fill it enough to come partway up the seat post. Remember the part where I said this could be flammable or even explosive? As the reaction dissolves the aluminum it creates sodium aluminate (a salt) and hydrogen gas. Right, hydrogen. Hindenburg anyone? 'Nuff said. As the gas is released it will bubble up bringing some of the sodium aluminate and yet unreacted sodium hydroxide with it. How much depends on how high the seat tube is filled with the solution and how concentrated the solution is. This is where I go with the low and slow approach. The seat tube can be filled to the point that you have an impressive volcano of sodium aluminate and sodium hydroxide spewing all over the place. Not only is this messy, it's dangerous because that can splatter anywhere onto aluminum bits still on the frame or exposed skin. Sodium hydroxide don't care, it'll start chewing through all of it.

In the video below you can see the speed at which I like the reaction to occur. Just enough to know it's working but no so much that it's blasting out of the seatpost. The white steam you see wafting out of the seatpost contains the hydrogen gas. At some point the reaction slows down to the point that it is basically stopped. It is then that if there is room I'll add a little more solution or I'll carefully dump out the used solution and put fresh in. If all of the sodium hydroxide in the seat tube has reacted the remaining compound is sodium aluminate which is a salt that isn't hazardous. Problem is there is still some unreacted sodium hydroxide in that black foam. That's one of the reasons I keep a hose handy by to keep rinsing off the frame and anything else it might get on. I also spray with white vinegar after the rinsing with water, the acid in the vinegar will help neutralize anything left that didn't rinse clean with water.
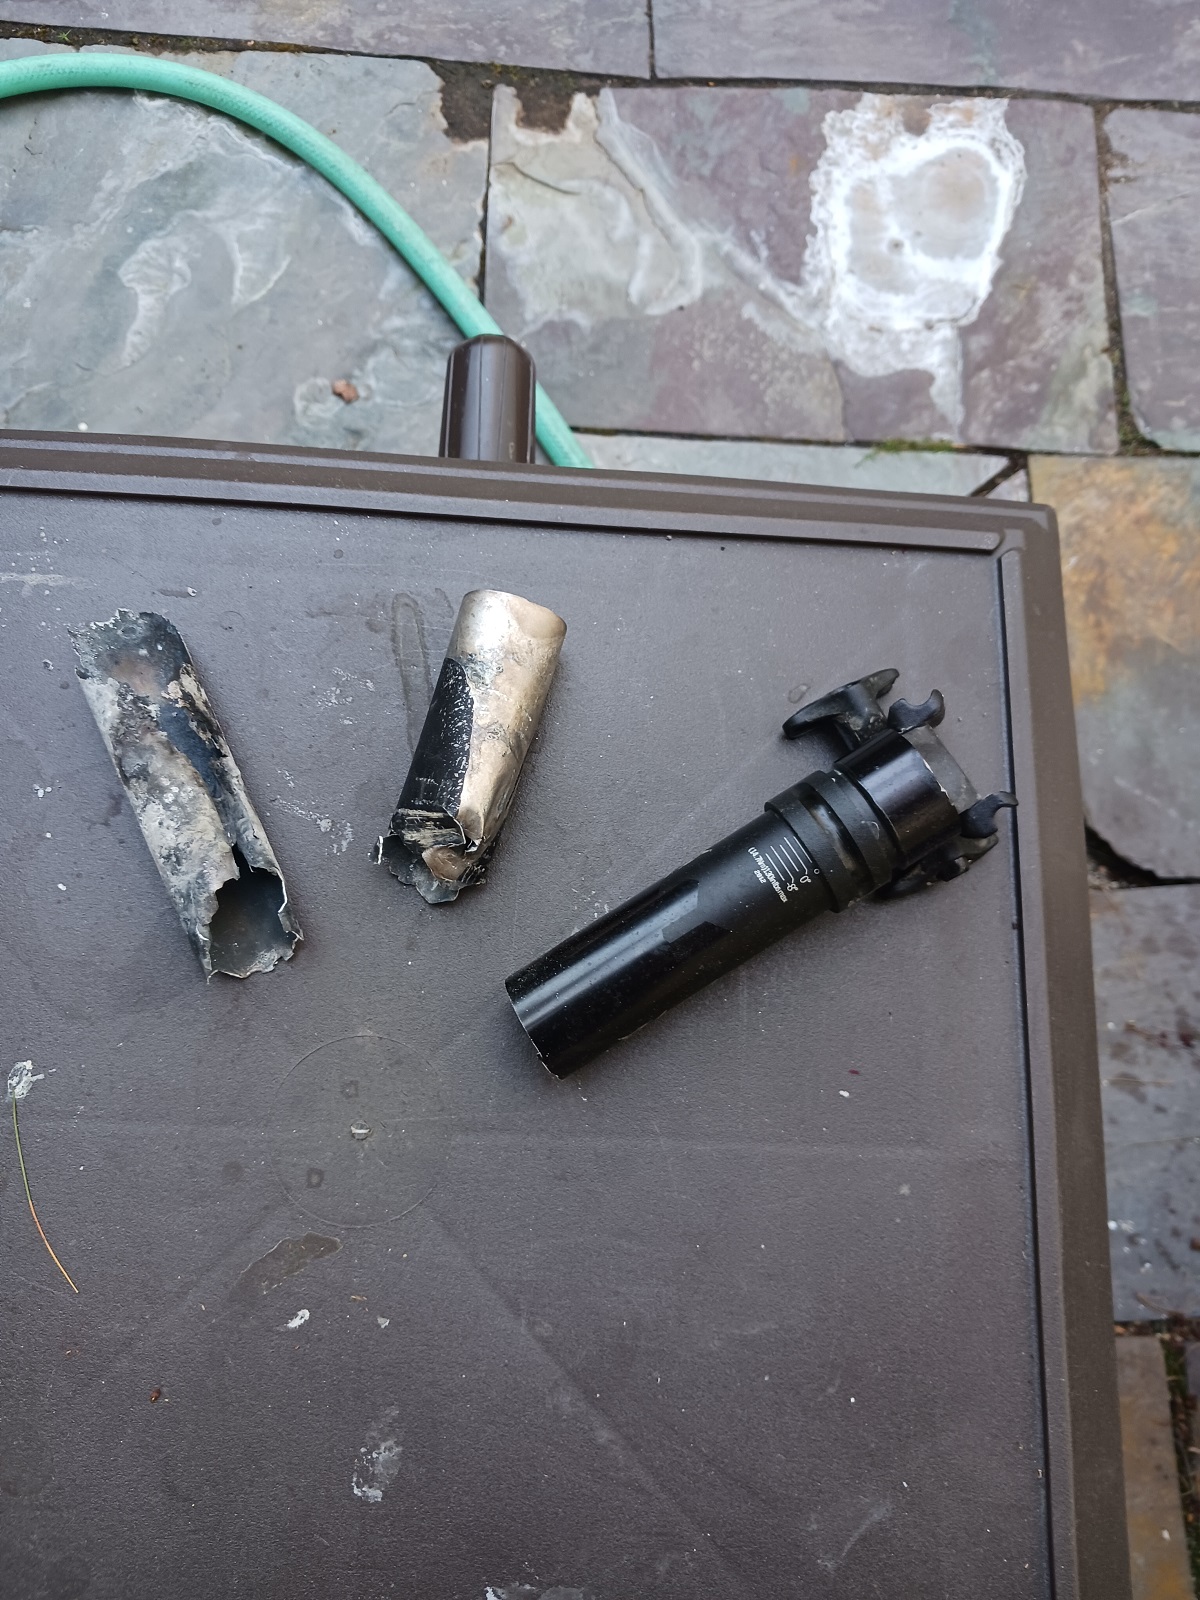
After this has gone on for some time I'll start testing the seatpost by gripping it with a pair of channel lock pliers to see if it has freed up. Spoiler here, the post has to be almost completely dissolved before it will come out. In the picture below you can see the tool marks on the post where I've tried to turn it. In fact the post will be thin enough that it can be flexed with the pliers. Even at this point, the frame will move with the post as you are almost collapsing the post with the pliers.
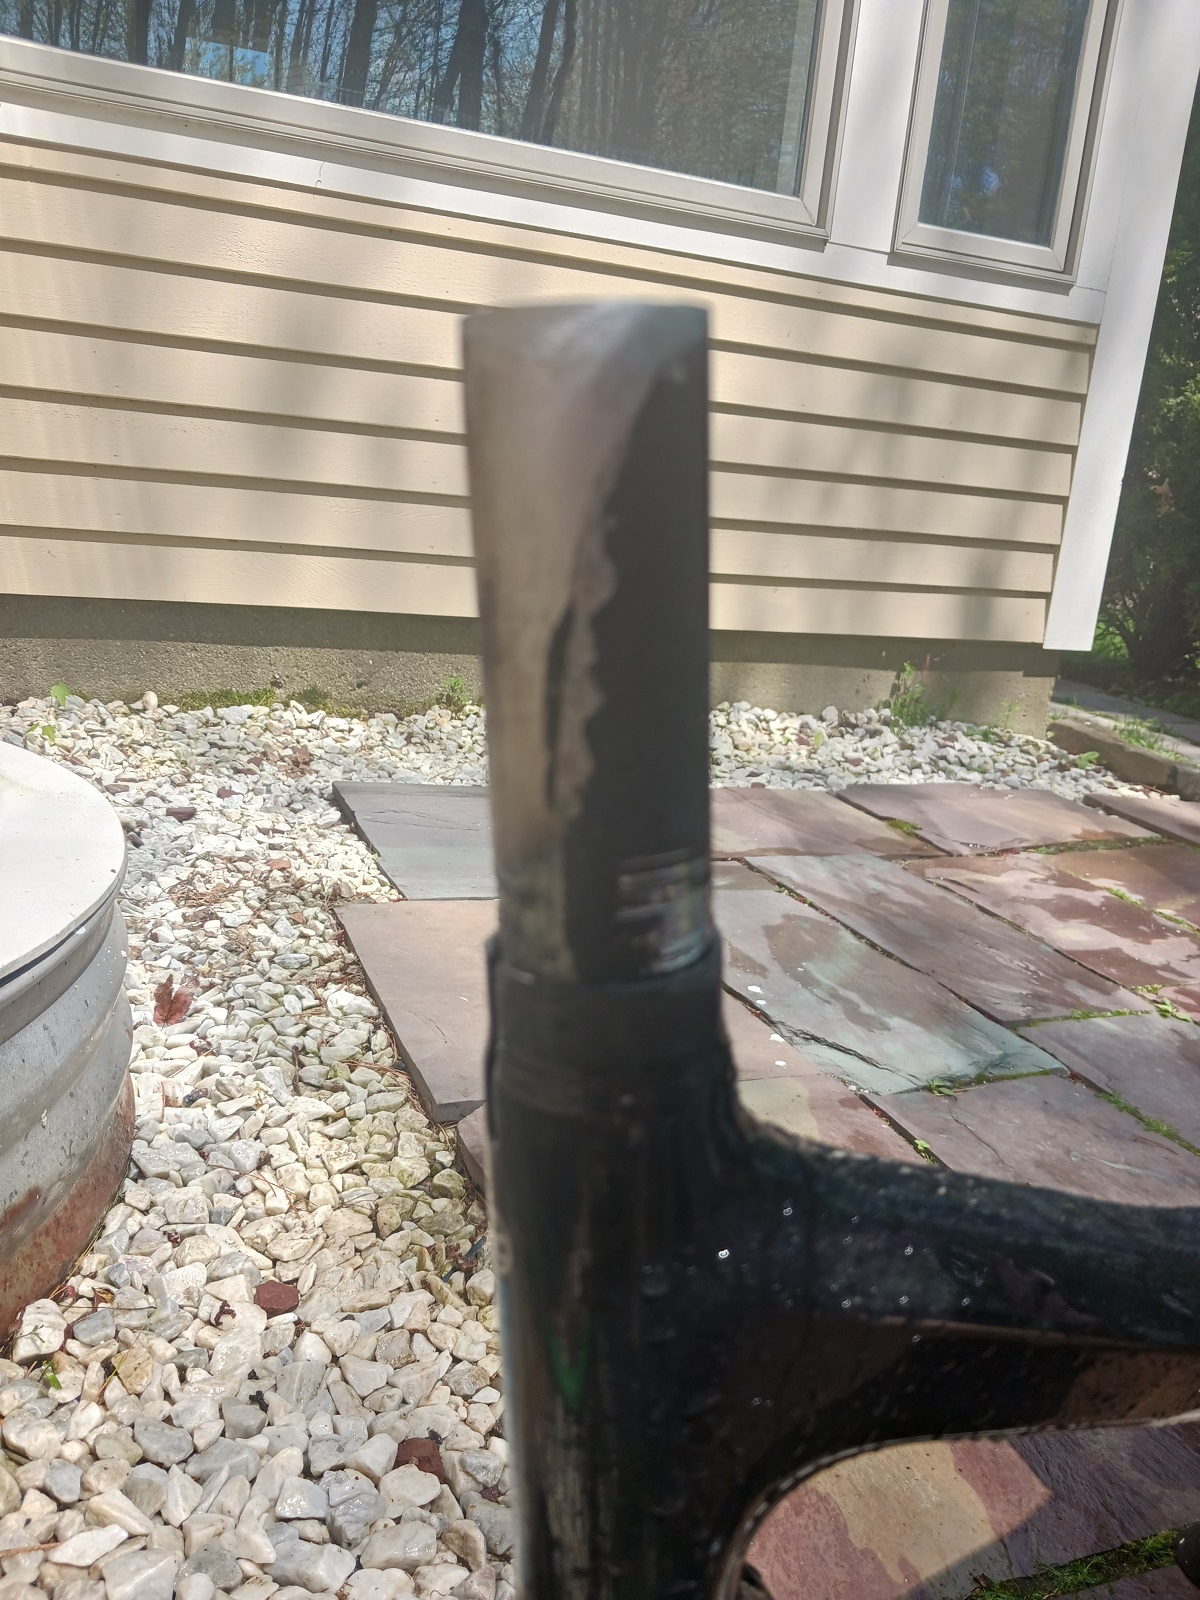
This particular frame was stuck even worse than most. The thickness of the post inside the frame got down to maybe twice the thickness of a soda can. At one point when trying to move it with the pliers it just sheared right of at the top of the seat tube. What I ended up doing is carefully running a pick between the post and seat tube at the thinnest point to open up a gap I could fit a pair of needle nose pliers in and grip the wall of post. From there I rolled the post internally onto itself to pry it away from the seat tube then pull it out. Still thinking you have some magic penetrant that'll pop that sucker right outta there? Mmmm, don't think so.
I finish up by rinsing everything thoroughly with water then hit it with some white vinegar for good measure. This whole process is somewhat time consuming, it usually takes me 3+ hours or so start to finish. Short money though if the other option is putting an expensive carbon frame in the trash. I've done this on I believe five frames now and I'm a little ashamed to admit two of those were my own. A famous person once said "fool me once, shame on — shame on you. Fool me — you can't get fooled again." Well, something like that anyway.